I've noticed that many bloggers give a summary of their year's sewing. Since this blog is supposed to be both an encouragement to me as well as a log of what I've done, I thought I'd do that, too.
For me, I think this has been a more prolific sewing year than sometimes. I've made 1 dress for oldest dd, 2 for youngest dd, and 3 for myself; a shirt for ds, 2 bias tops (love these!), pj bottoms galore, various and assorted cupcake pincushions, a couple of purses without a pattern, Christmas tree skirt, placemats, a few muslins (good thing for those since one was definitely a wadder!), a bra, and one pair of panties. Yes, that's pretty good.
Did I have favorites? Oh yes. Definitely. I LOVE my purple silk dupionni dress. I really like the floral dress--it is comfortable and cool. The bra--wow. So comfortable that more need to be a priority. Prettier ones though. Beige is boring! haha. I also love the Christmas dress for youngest dd.
Did I have non-favorites? After all the time and effort, it is hard to say that I hate them, but yes. I HATED this Vogue dress! It looks like I was wearing a sack (I don't think I ever posted a picture of me wearing this one.). And the elastic at the top! ICK! Many others made it and loved it. Oh well. I may recycle the fabric for this one. Surely I should be able to squeeze out a short sleeved or sleeveless top.
So, that is that! For the most part, I sewed successes. Plus, I learned quite a bit about fitting and zippers. Many thanks for all the tutorials other sewists have put on their blogs--such a help to learn about techniques or get reassurance.
Friday, December 31, 2010
Thursday, December 30, 2010
Christmas Dress 2010
In my last post, I forgot to add a link so you could see what a Mini Bow Tucks bag is. Shannon, of the blog MushyWear, kindly drew my attention to that so I went back and added the link. These purses are so much the rage in our area that I forgot that not everyone knows what they are! Even so, I have not made one yet, I just have the pattern ;)
Posts have been few and far between this month. I feel like a pharmacy--we have had so much illness I think all I've done is dispense medicines.
However, I did get the youngest dd's Christmas dress, McCall's 9534, which is out of print, completed.


This dress really needed something to break up the plain white corduroy and the holly embroidery on the fabric. Once I had sewn the bodice to the skirt, I thought it looked a lot more like a nightgown than a dress! So I added the green sash and the beads to break up the white. I think it was pretty successful, don't you?


Posts have been few and far between this month. I feel like a pharmacy--we have had so much illness I think all I've done is dispense medicines.
However, I did get the youngest dd's Christmas dress, McCall's 9534, which is out of print, completed.

You must pardon the pose and the tights! Apparently, she learned the pose from a fashion designer game. The tights were such a struggle to get on the right way this morning to wear with another dress there was no way she was changing them for the picture!

This dress really needed something to break up the plain white corduroy and the holly embroidery on the fabric. Once I had sewn the bodice to the skirt, I thought it looked a lot more like a nightgown than a dress! So I added the green sash and the beads to break up the white. I think it was pretty successful, don't you?
Here is the bead work in progress. Tiger tape was quite useful to mark the spacing for the beads!

The only things I changed were lengthening the skirt and omitting the facings. I bought some red Christmas fabric and made bias binding for the neckline, sleeves and hem. Since I used corduroy, I serged all the edges.

Super easy dress to make, except when you decide to add beads!
Tuesday, December 7, 2010
Sundays Are Hobby Days
Not that long ago, we used to regularly spend our free time on Sundays engaged in hobbies. Sadly, we had gotten out of the habit and except for church, it was pretty much a day like any other. It's such a nice change of pace, a breather during the week, whatever you want to call it.
It also gives me a reason to make myself go sew. (Well, when everyone else doesn't decide to sew and hog the sewing room. sigh.)
This Sunday, oldest dd decided that she needed to sew. Here she is cutting out a Mini Bow Tucks purse:

I think she was amazed at how long it took her to cut it out which meant that she ran out of time to do any sewing on it. The blue, green and white fabric she chose is really pretty. I hope she gets it sewn soon because I think she will love it! It sure will look a lot better than the store bought ones that she has.
I have a couple of sets of fabric to make my own purse, maybe that will be my project for next Sunday!
Monday, November 29, 2010
Another PJ Set and a Proud Daughter!
My youngest dd finished her pajama pants! I bought a plain, white t-shirt and she used some embroidery floss to weave through the picot edge at the top of the shirt to dress it up a little. I had her do the front only so the neck opening would still stretch! I'm not sure you can see the pink floss around the neck, but oh well! It's there!

Here she is:

I think she's very proud of her accomplishment! Since she's so young, we've tried to have very short sessions. I did any pressing like turning up the hem and making the casing for the elastic. Putting the elastic in the casing turned out to be difficult since the seams were pressed open, so I did that for her, too. But, otherwise she did all the work! She got a lot of practice maintaining the seam width while sewing and she got to use her 1/4" foot a bit.
Monday, November 15, 2010
PJ set complete!
Okay, here is one set of completed pj's! The t-shirt is purchased and I added these bows that I had in the stash to the shirt and the pants. The white eyelet at the bottom of the pants is also stash since youngest dd is taller than I estimated. The pink polka dot fabric was a knit from my To Get Rid Of Pile at sewing guild (which obviously never happened) until it caught my eye for pj's!
The only exciting thing about construction for these is that I serged the waist elastic to the edge of the fabric, then turned it under and topstitched. It looks more RTW that way and it should keep the elastic from turning and twisting like it does when you make a casing.

The only exciting thing about construction for these is that I serged the waist elastic to the edge of the fabric, then turned it under and topstitched. It looks more RTW that way and it should keep the elastic from turning and twisting like it does when you make a casing.
Based on the squeals I heard, these are a hit!

Sunday, November 14, 2010
Where Have I Been??
Dear Readers,
Thank you to the people who still take the time to check this blog for posts! I appreciate it and the comments on my last post. Thank you!
When I started this blog, I wanted it as a record of what I sewed and as an incentive to sew more. Well, I have definitely accomplished the first but not so much the second! I'm sorry for the long break (saying that to myself, too!). That includes all the sewing blogs that I have not read--I've missed doing that!
Have I accomplished anything in the sewing world? Not a great deal personally, but rather a lot as a facilitator. Several months ago, our local sewing guild began a local community sewing project which I posted about here and here . I'm happy to report that we surpassed our goal of 500 blankets for the babies and children at our local hospital! That was really cool--and I think we will continue to get more. Those blankets have at various moments taken over my sewing room which thankfully didn't matter much due to the lack of sewing!
My youngest dd has sewed a small amount on her flannel pj bottoms. I finished one pair of knit pj bottoms and started on another pair. Not very exciting, but it is something. I'll see about posting pictures next post--which will be soon!
Future plans are to go slowly and finish sewing the last pair of pj pants. Then, it will be on to youngest dd's Christmas dress and binding the edges of the Christmas tree skirt. So much for the pink wool and the Dalmatian dress. My sewing room also needs some cleaning up partly due to all the blankets and partly due to grabbing and running then not putting things away! Oops!
So, what have I been doing since I haven't been sewing? The usual things that most people w/ kids do and some extras--some fun and some not so much. The girls participated in a fashion show (neat because the lady sews all the wedding and bridesmaids dresses herself--and designs them), toured a couple of colleges, watched lots of Lego robotics stuff, finished soccer season (yippee!), and gotten new stair treads (great now, not so great during the process since they can't be used for a day each time they get a coat of polyurethane!). Plus the very time consuming process of having temper tantrums so my dd and dh would work on dd's transcript stuff and my own diligent work (or not very diligent at times) on course descriptions to supplement the transcript. haha. Just proofreading all that is quite a bit of work....and left my eyes too tired to even think about reading sewing blogs so you know it was bad!
Onto the relaxing holidays! (Did I really say that??? Did I really mean that? NO.)
Sorry for the lack of pictures!
Sunday, October 31, 2010
Some Placemats
Life has been so busy lately (I know no one knows anything about such things, right?! haha!), that these are all that I've gotten sewn and only because it was a guild sew-in!

A top view of them on the table so you get the fresh flowers, too! I made black napkins with serged edges using glow-in-the-dark thread!

A top view of them on the table so you get the fresh flowers, too! I made black napkins with serged edges using glow-in-the-dark thread!
Wednesday, September 29, 2010
Pajamas Detour
In this post about the Shop Hop, I mentioned buying some Beatrix Potter print flannel for youngest dd to make her first pair of pj pants. She's been sick and I thought it was a good time for me to cut them out so when she felt better they'd be ready to go! One thing led to another and I got out this pj pant and t-shirt (purchased) w/ an applique to compare sizes before I cut out the Beatrix Potter flannel:

Please notice (and feel free to rave about) the matching stripes. I hardly had any fabric (under a yard) to make these since it came out of the remnant bin at Joann's at dd's prompting. And, of course, the stripes HAD to match! Anyway, that was a project from January but still a good gauge to see if I needed to lengthen the pattern (I did!) or go up to the next size (I didn't).
Cut out and awaiting youngest dd's sewing...

While I had the pattern out, my glance fell to the stuff I was going to toss on the ASG sale table at our next meeting and then I'm dragging out a couple of other pieces for more pj's. So much for clearing out! Quick and easy projects though and the pj's are needed. This Simplicity pattern is getting a workout!


And, might I add, I now understand why everyone is complaining about blogger and pictures! This is a pain!

Please notice (and feel free to rave about) the matching stripes. I hardly had any fabric (under a yard) to make these since it came out of the remnant bin at Joann's at dd's prompting. And, of course, the stripes HAD to match! Anyway, that was a project from January but still a good gauge to see if I needed to lengthen the pattern (I did!) or go up to the next size (I didn't).
Cut out and awaiting youngest dd's sewing...


And, might I add, I now understand why everyone is complaining about blogger and pictures! This is a pain!
Sunday, September 19, 2010
What's Next?
I've been thinking really hard about my sewing queue. My needs and wants for myself are pretty straightforward. I need fall and winter tops and perhaps a dress or skirt. I want to make jeans, bras and panties. The wants will probably come before the needs for the odd reason that I want to make sure that I retain all the sewing information I got during ASG conference before I forget it all! Plus, I have the jeans muslin all prepared which saves some time and planning. I will need some bras soon, so I guess putting them higher in the queue isn't a bad thing.
Some other sewing that I ought to do is for the youngest dd. She needs fall and winter dresses and I have 3 pieces of fabric that need to be sewn for her. First, this Dalmatian smocking insert is ready to go (I won't discuss how long that's been ready!). This will make a great transition type dress from the hot to the cooler days. I've already posted pics of this, but here's one again:
.JPG)
Next, I have this really lovely piece of pink wool that I bought during last winter:
 It was a kit type thing from http://www.sewitup.com/. I didn't feel like buying another pattern, so I'll use McCall 9534 which is OOP. The fabric is just wonderful feeling!I have some Bemburg lining for the inside so it will be soft against dd's skin! This should carry her through the winter.
And finally, a piece of corduroy for a Christmas dress. This one bothers me because I can't decide how I'd like it to be made. It has holly embroidered on it although it almost looks like a string of Christmas tree lights from this picture! At first, I'd thought about smocking an insert for it, but since the corduroy is white I don't want to use a white insert. So I think I'll make it easy on myself and just aim for a simple dress using the same McCall 9534 as for the pink wool one! It will look different with some green ribbon and red highlights which I can play with depending on what I find at the store.

Some other sewing that I ought to do is for the youngest dd. She needs fall and winter dresses and I have 3 pieces of fabric that need to be sewn for her. First, this Dalmatian smocking insert is ready to go (I won't discuss how long that's been ready!). This will make a great transition type dress from the hot to the cooler days. I've already posted pics of this, but here's one again:
.JPG)
Next, I have this really lovely piece of pink wool that I bought during last winter:

And finally, a piece of corduroy for a Christmas dress. This one bothers me because I can't decide how I'd like it to be made. It has holly embroidered on it although it almost looks like a string of Christmas tree lights from this picture! At first, I'd thought about smocking an insert for it, but since the corduroy is white I don't want to use a white insert. So I think I'll make it easy on myself and just aim for a simple dress using the same McCall 9534 as for the pink wool one! It will look different with some green ribbon and red highlights which I can play with depending on what I find at the store.

Quite a number of years ago now, I used this same McCall pattern to make my oldest dd a dress. It has got to be the best multi-purpose dress I ever made! I used red polar fleece and its first purpose was for her to be a strawberry for Halloween. I used some long straight stitches on the front of the dress itself in a gold silk ribbon, just like those markings on the outside of strawberries! I attached some cheap, slippery, red lining fabric the entire length of the underarm so that when she held out her arms, it made the entire dress strawberry shaped! Some fabric paint for the gold markings on that carried on the markings appropriately. Then, to top it off, I made a red polar fleece hat with the green strawberry 'cap' on top. The silk ribbon was quick and easy to take out and since I had basted the underarm 'strawberry' on, that was quick to remove so she had a plain red winter dress!
The next year, she wanted to be a cardinal. Out came that red dress and I stitched giant red feathers onto it. Again, quick and easy to remove. Some red facepaint applied in a feathery fashion and a little yellow beak completed that look.
Wish I had some pictures to show you! I was thinking about when I had used that McCall pattern and then I remembered that it was for this multi-purpose dress so long ago!
Thursday, September 16, 2010
Christmas Tree Skirt Complete!
Well, the tree skirt is done! It needs to be taken to the quilter for assembling the layers and quilting them. I'll need to cut a hole for the tree and bind the edges when I get it back. Most people who participated in the sew-in for this projected left it whole because they hated to cut into it! I agree; it's pretty as is, but I do really want a tree skirt so I think I'll cut into mine when I get it back.
It's a great feeling to have finished something! It's a little wavy looking since I pinned it to the curtain to take the picture.


It's a great feeling to have finished something! It's a little wavy looking since I pinned it to the curtain to take the picture.

Here it is flat and folded in quarters:

Here ends my chapter (maybe it should my book!) in quilting!
Sunday, September 12, 2010
Shop Hop
I did my first ever Shop Hop over the weekend! Some very hard working ASG members put it together with 8 local shops ranging from home dec to sewing machines to quilting stores. It was fun to go to each store to see what they'd put together for the Hop. It was also fun to run into guild members at the stores. I know I really enjoyed all of it!
I bought 2 sets of fabrics for a placemat sew-in later this month, which are being processed in the washer :) One set is for Halloween, including some solid black to make napkins using glow in the dark thread on the edges! I bought a few patterns which I might either give away as gifts or sew up as gifts. I liked the tie pattern, shown on the left. It looked quick and easy. The middle Kwik Sew pattern looked like a good basic pattern. And the organizer on the right is something we can all use!

Here are some freebies given out by a couple of shops. The pattern on the left is for a Christmas tree skirt and the pumpkin fabric is a fat quarter.

I also bought yarn for the older kids to knit while we're reading aloud. I got a brown slightly fuzzy yarn for ds and a lavender silky soft bamboo blend for dd.
The youngest dd chose some Beatrix Potter flannel to make herself some pj bottoms. I think this will be a great project for her if I do the cutting out and pressing for her. This stuff shrank a LOT in the wash so I'm running it through again and hoping that we'll still have enough :(

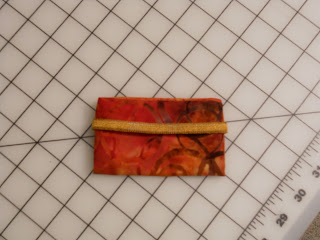
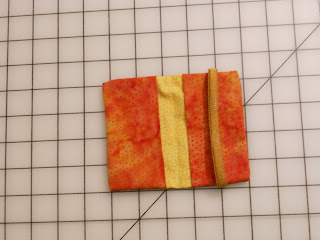
Only one store had a make it and take it project. Who knew that a project could be sewn to completion in less than what? 3 minutes? Of course, the fabric was pre-cut, but still. It's a card holder made using the serger...and the strap across the front is elastic covered in heavy rayon thread using the serger (this was already done for us). I haven't pushed the corners out all the way yet!
I bought 2 sets of fabrics for a placemat sew-in later this month, which are being processed in the washer :) One set is for Halloween, including some solid black to make napkins using glow in the dark thread on the edges! I bought a few patterns which I might either give away as gifts or sew up as gifts. I liked the tie pattern, shown on the left. It looked quick and easy. The middle Kwik Sew pattern looked like a good basic pattern. And the organizer on the right is something we can all use!

Here are some freebies given out by a couple of shops. The pattern on the left is for a Christmas tree skirt and the pumpkin fabric is a fat quarter.

I also bought yarn for the older kids to knit while we're reading aloud. I got a brown slightly fuzzy yarn for ds and a lavender silky soft bamboo blend for dd.
The youngest dd chose some Beatrix Potter flannel to make herself some pj bottoms. I think this will be a great project for her if I do the cutting out and pressing for her. This stuff shrank a LOT in the wash so I'm running it through again and hoping that we'll still have enough :(

Only one store had a make it and take it project. Who knew that a project could be sewn to completion in less than what? 3 minutes? Of course, the fabric was pre-cut, but still. It's a card holder made using the serger...and the strap across the front is elastic covered in heavy rayon thread using the serger (this was already done for us). I haven't pushed the corners out all the way yet!

Outside.

Inside.
Wednesday, September 8, 2010
Very Little Sewing...

....as you can plainly see! I did take my Christmas Tree Skirt and got quite a bit done on it although it isn't finished yet.

It's nearly done, but sadly we've gotten caught up in school! Never again will we take a summer off--it is too hard to get started and it feels like there's no more time left over for me to sew!!! After watching youngest dd on the beach, it might be time to start sewing swimsuits. Getting them to stay on or up all the way seems impossible for store bought ones. Next year!
Wednesday, August 25, 2010
Youngest DD Sewing Update
Youngest dd has progressed from sewing on paper without thread to sewing on muslin single layers to pinned double layers, removing the pins before she gets to them. She has been a steady worker and it has been just amazing at how quickly she's learned! Here she is working on a flannel bag for some of her little toys:


Stitching the seams.

Turning the bag right side out.
Saturday, August 21, 2010
Kwik Sew 2100 or Unmentionables
Well, I did it! I made my first ever pair of panties and I used up one kit I bought at conference! A good feeling all the way around. And, you know what? The panties actually look like regular store bought ones--I know, you'd think that would be obvious, but sometimes sewing can look not store bought and downright homemade.
I used Kwik Sew 2100 and made a size 6 in a bikini. That means that I'll be able to squeeze another pair of panties from the kit fabric, but I will need to purchase some more elastic. Here they are:

I used Kwik Sew 2100 and made a size 6 in a bikini. That means that I'll be able to squeeze another pair of panties from the kit fabric, but I will need to purchase some more elastic. Here they are:

Just a quick run down on the sewing of these. I used the sewing machine and not the serger, practising using some of the stretch stitches on the machine. It seems like you can use pretty much whatever makes you happy and get good results.
As to the fit and all that, well, when I held them up I thought they looked huge! But once I completed the sewing, they looked a lot better and fit perfectly! Except for (you knew that had to be part of it!) the front leg and the back. I think the front leg opening needs to be raised--it looks funny when it's on me. The front waist and back waist of the panty are very different heights--the front sits perfectly for a bikini, but the back is really, really high. That would be perfect for a higher waisted panty, but not so much for these. And it just looks lopsided with the back so high and the front so low. I'll have to see about adjusting the pattern in my next pair. All in all, I'm really pleased with them! A quick and easy project for sure and one that I look forward to trying again...except for one problem. While I have 2 more undies kits, finding more will be a problem!
Wednesday, August 18, 2010
Purchases
The temptation to go hog wild buying goodies at the ASG Conference Exhibit Hall was stopped with difficulty! I managed to come home with a small assortment of fabrics and a few tools.
First up, the fabrics:

From left to right, light blue cotton and silk (I think) blend, navy jacquard acetate slinky knit, aqua cotton oxford, blue and white cotton plaid, burgandy and silver cotton stripe.


Finally, I have been looking at garment bags and just wanted something simple. I saw this and thought it looked easy and I loved the fabric! Wouldn't you know it? I got back home and went to one of our local shops and they had the same fabric! I don't think they had it before conference though or surely I would've noticed it??? Oh well! They didn't have the pattern though!
As for tools, I bought a pattern notcher, Japanese hand sewing needles (rather a big assortment and very expensive), a silicone thimble (I am thimble resistant so thought it was worth a try), a point presser, and a tracing wheel and paper. Nothing too exciting there, but they were things I can't find around here.
Any regrets? Only one--there was a piece of nifty silk in cool colors with a wide striped pattern with lots of details on it. Beautiful, very expensive, and I couldn't decide what to make if I bought it! So it stayed. Perhaps I should've bought it just to look at it!
Only one other thing comes to mind--while the exhibit hall was fantastic, I really want a one stop shopping source where I can find not just fashion fabrics, but the stuff that coordinates with them like linings and the little details that would add to the finished look of a garment (trims, neat zippers, etc). Perhaps a trip to New York needs to be put on the ol' wish list? Maybe one day...
Thanks to everyone who has commented on the ASG Conference posts. It was fabulous! I had great teachers with hands on activities (I am the type to get bored very quickly in a lecture only situation). I've come back home energized and inspired!
First up, the fabrics:

From left to right, light blue cotton and silk (I think) blend, navy jacquard acetate slinky knit, aqua cotton oxford, blue and white cotton plaid, burgandy and silver cotton stripe.

Here's a closer pic of the slinky knit and cotton/silk(?) fabrics. I don't usually enjoy synthetics as much, but I loved the navy with the jacquard (not sure if that's the right term) pattern on this fabric. I got a little over 2 yards so it will be perfect for either a shirt or possibly a dress. The stripe is destined to be a blouse for me. I loved the little bit of shine the stripes had on the light blue.

I loved these two because I think both sides of the fabric are interesting and will sew up well using the wrong sides for details, like that blouse that was on the most recent issue of Threads magazine. Can you see how the checks on the blue look different depending on which side is up? And on the burgandy, the stripe is shiny on one side and matte on the other.

Finally, I have been looking at garment bags and just wanted something simple. I saw this and thought it looked easy and I loved the fabric! Wouldn't you know it? I got back home and went to one of our local shops and they had the same fabric! I don't think they had it before conference though or surely I would've noticed it??? Oh well! They didn't have the pattern though!
As for tools, I bought a pattern notcher, Japanese hand sewing needles (rather a big assortment and very expensive), a silicone thimble (I am thimble resistant so thought it was worth a try), a point presser, and a tracing wheel and paper. Nothing too exciting there, but they were things I can't find around here.
Any regrets? Only one--there was a piece of nifty silk in cool colors with a wide striped pattern with lots of details on it. Beautiful, very expensive, and I couldn't decide what to make if I bought it! So it stayed. Perhaps I should've bought it just to look at it!
Only one other thing comes to mind--while the exhibit hall was fantastic, I really want a one stop shopping source where I can find not just fashion fabrics, but the stuff that coordinates with them like linings and the little details that would add to the finished look of a garment (trims, neat zippers, etc). Perhaps a trip to New York needs to be put on the ol' wish list? Maybe one day...
Thanks to everyone who has commented on the ASG Conference posts. It was fabulous! I had great teachers with hands on activities (I am the type to get bored very quickly in a lecture only situation). I've come back home energized and inspired!
Monday, August 16, 2010
The American Sewing Guild Conference Day 4
Finally, the last day! The time was both slow and fast at the conference. My last day was my only partial day class, a four hour morning class. I came out with a nearly completed bias blouse! I loved it! Here it is finished:


I had enough fabric left over to do this for the youngest dd:

I know, it loses something hanging on my hand!
Who knew that you could achieve such a great looking top in such a short time and without a pattern? I bought a kit from the instructor, Julianne Bramson, with the most fabulous rayon batik fabric. As you can see, it worked wonderfully for this project! Julianne specializes in bias clothing and has several patterns. You can check out her website, Fashion in Harmony, to see her patterns and fabrics. I wish I had a store close by that carried such great draping fabric!
Julianne had lots of samples of bias garments in class. She also taught how to modify the neckline and add a couple of different sleeve styles. So easy and such great results!
Next up, I'll be brave and show you some of the things I bought while at conference. In the meantime, I'm working hard on cleaning up my sewing space and rearranging it, too! Gotta have room for all the ideas running around in my head, plus I need to have space for the new purchases! Really, it's more like I've reached my clutter limit and can't take it any more!
Sunday, August 15, 2010
The American Sewing Guild Conference Day 3
My Saturday class turned out to be so relaxing! Who knew learning couture techniques to complete a little black dress would be like that? I had Susan Khalje and our class title was (obviously!) 'The Little Black Dress'. My readers already know from this post that I put all the stress and worry into the class beforehand because I wanted a perfect pattern! Really rather silly in some ways, but not so much in others.
Anyway, before class most of us had to see Susan to be fitted in our muslins that we'd made before the conference. She marks the adjustments on the muslin and then you take it off to save for class. She had two students who had not been fitted before so we got to watch that process in class. Interestingly, they were two of the more difficult ones with a lot of adjustments so that Susan had them incorporate those adjustments and try the muslins on again later for more fitting. It was a neat process to watch plus fun to see the patterns that others chose.
After watching the fittings, we worked on marking our changes to our own muslins on both sides and then making friends with our seam rippers to take them apart. The muslins are now our patterns and ready to go! Pretty neat.
Next, we worked on various hand stitches and talked about their usages. We also got to see samples of Susan's work--fun all by itself. It was cool to recognize various garments that I'd seen in Threads magazine. I am looking forward to trying a handpicked zipper--really easy, great control, and a potential decorative factor as well. I did mine on some very dark navy linen fabric with white thread, so I don't think a photo of it would show up very well except for the white stitches! But wouldn't that make a neat sailor type garment--dark navy with white thread topstitching?
Here are a couple of photos of a sample we made of fabric "sandwiches", fashion fabric, underlining, and lining:

This shows the prick stitck, used to keep the lining secure, and the fell stitch, done to join the lining to the fashion fabric and underlining at the neckline.

This shows the underlining basted to the fashion fabric and a catch stitch used as a hem.
We spent quite a bit of time talking about fabric layers and how you can achieve different effects based on what you use as an underlining. In the sample photos above, I used silk dupioni for the fashion fabric, silk organza for the underlining, and silk crepe de chine as the lining.
Playing with fabric and doing those handstitches is fun and relaxing!
Saturday, August 14, 2010
The American Sewing Guild Conference Day 2
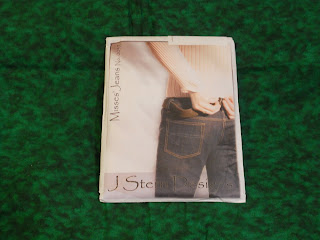
My next class which was on Friday was a Jeans Muslin Workshop, another all day class, with Jennifer Stern Haseman of J. Stern Designs. Another wonderful day! I was the first one finished--not sure how that happened, but that's okay! It gave me time to shop in the exhibit hall where I went straight to Jennifer's booth to buy denim for my first pair of jeans. I'm still running it through the wash (she recommends 5 washings to get the dye out and allow it to finish its shrinking) but hope this will be a completed project soon so I can enjoy them this fall.


Here's the denim along with a Swarovski jean button--sorry, that is very hard to see in the photo!
Here's Jennifer's pattern for the jeans:

One of the first things we did was to take our hip measurements and then try on the jeans muslins that she had available in ALL sizes. She helped each of us individually look the muslins over and record changes. She had some wonderful handouts with step by step directions leading you through the changes, plus pointing out any other patterns pieces that would need adjusting if you changed one area. Very helpful. She had her muslin and I think these worksheets packaged to sell as kits at the conference.
Anyway, the muslins needed to be a snugger fit than the jeans will be--gotta say, I'm sure it works, but those muslins sure look awful and terribly unflattering on! Let no sag or bump go unnoticed and yes, I will spare you a picture of me (or anyone else!) in the jeans muslins! Here it is flat though:

Front

Back. The little rectangles of extra muslin are there to cover up my name which I wrote all over the muslin. Sure did not want to get my custom muslin confused with anyone else's!
Let's see if I can remember the adjustments we made:
-shorten the legs above the knee
-raise the waist 3"-4" (I'm not wearing low rise jeans!)
-add some room to the back because the side seam was pulling forward
-redraw the crotch curve (she automatically assumes that everyone needs to do this)
-add 1/4" to see seams for ease
In addition to her terrific directions and help in class, she has a blog J. Stern Designs blog that has additional information. Jennifer, just like all the other instructors at the conference, was very generous about telling people to email her with questions. She also had a khaki pants pattern that looked interesting and this really great looking blouse pattern with a peplum--those are so flattering on me. However, I figured I had more than enough fun stuff to keep me busy for awhile!
Friday, August 13, 2010
The American Sewing Guild Conference
If you ever have the chance to go to the ASG conference, then go! I highly recommend it. I've been working on getting back to real life which is so hard because I want to go sew. sigh. I didn't take any pictures while I was there, but do have some of the things I worked on. I took four classes: Bra Making, Jeans Muslin Workshop, The Little Black Dress, and a Bias Top. The first three were all day classes, roughly from 8 to 5, with an hour lunch break. The last one was a half day class from 8 to 12.
First up, bra making with Anne St. Clair of Needle Nook Fabrics in Kansas. Each student needed to go in the night before to try on bra samples and be fitted in the correct size. That night, Anne and her wonderful staff cut out ALL of our patterns for us, including any adjustments Anne thought were necessary. When we went in the next morning, we got a little overview and general information about the process. We also got to see what fun you can have if you make your own bra--matching bra, shirt, and panties! How great is that??!
Our bras were plain Janes made in either beige or black. We cut out our fabrics and got to work. I gotta say that this class is pretty intense and busy, but there's plenty of help along the way. Seating is assigned so that you're sitting with other women who need similar adjustments. Anne, Janet and Grace continuously circulated around the room helping and teaching in small groups as each step came up. It was great! I came out with a finished bra, plus enough fabric and supplies to make two more.
Anne considers the first bra to be a wearable test muslin so you can wear it some to be sure that it feels comfortable and fits properly. I wore mine one day and it felt great, so I think I'm ready to enjoy some of the fun bra kits I bought! I would've worn it more, but let me just say that the machines for this class were just AWFUL. They are ASG owned machines which were used last year for this class (and didn't work great then either). I sewed on them the following two days, too. They were fine on the muslin and other fabrics but completely rotten on the stretchy silky bra knits. The stitching across the cup seam looked rather pointy, not a beautiful look under many tops! I had a sweater that worked fine as a test run, so I could at least give my new bra a try. Just great! I love it!
Since this has gotten so long, I think I will break the classes up into separate posts, so look for the other three classes later! Here are some pics:

This shows the bra making supplies on the left, the book by Anne St. Clair (provided for class use, optional to purchase which I did), and my pattern pieces.

Finished bra! I have extra padding in the right side to compensate for being a little lopsided. The kids always preferred nursing on the left....sigh.

I bought 3 matching bra and panty kits, plus a panty pattern. From the left, a light blue cotton knit, raspberry metallic cotton knit, and a shiny stretch on the right. Can't wait to get into these!
Thursday, August 12, 2010
Simplicity 5364
Today marks the due date for the Ugly Fabric Challenge issued by our local chapter of the American Sewing Guild. I originally posted about this in May here: Various and Assorted Catching Up. It seems like a long, long time ago now! Of course, I put it off until the last minute. Bad me. Once I adjusted to the color of the fabric, I knew it would be perfect for the guys in my life! They look good in browns so 2 pairs of pajamas pants it was! I used Simplicity 5364. All of one pattern piece required. Super easy, just matching the plaid took a bit of time, during the cutting out. Sewing was a breeze using the walking foot on my machine! It used up most of the fabric, too. Good feeling!


The only thing to note is that I put in elastic in the bottom of ds's pants so his can be longer since he keeps growing! Otherwise, no changes at all.
A brown or black t-shirt and this project is ready for the cold weather!
There were some really terrific projects tonight. People were very creative with their ugly fabrics!
Wednesday, August 4, 2010
DH Sewing Update
I had hinted in earlier posts about dh's sewing projects, but haven't followed through on his completed projects. He went from this:


To this:

FOUR dogs beds, yes! Out of all that stuffing (that was photographed after stuffing one bed). The cut outs on the top are the fashion fabric covers for the beds.
To this:


Edited to add the pictures of the completed beds! Sorry, I forgot to put them in before posting!
And, finally, something completely different! Here's the apron made from some lovely cotton batik purchased at a local quilt shop. He modified the pattern, Simplicity 2824, to make it more substantial at the top by adding a backing/lining. Here's the final result:

Saturday, July 31, 2010
Preparing for ASG Conference Class 'The Little Black Dress'
Deadlines. It's a word I personally don't use much any more since I haven't worked outside the home in a long time. But, wow, this year is certainly a year for LOTS of deadlines and no matter how hard I try to stay on top of things, it still leaves me feeling slightly frantic (or should that be frenetic?).
One of those deadlines that's upcoming is preparing for the American Sewing Guild Conference! Very exciting since I'm sure I won't be going again any time soon. I chose mostly full day classes since I'd really like to expand my horizons and try things I've never done before...like jeans and bras. Blessedly, those classes have easy prep--show up with a few items for the most part.
The only class that has quite a bit of prep beforehand is The Little Black Dress with Susan Khalje. I'm reallyanxious excited about it! We had to choose a pattern for our dress--which I think has been the absolute hardest part! Pattern selection is usually kinda fun--all fantasy and imagination--which probably explains why I have more patterns than finished products from them! But choosing THE pattern for a LBD--well. I guess it's because I want it to be perfect since I know I will have Susan's help getting the muslin to fit just right and it will be a never again repeated opportunity.
So after much agonizing and pouring through the various pattern companies' websites plus the suggestions that Susan sent for patterns, I chose this Butterick 5459:

That would be View C, the middle picture, not the coat views! I wanted something classic, with a seam at the waist (so I might look like I have a waist), with the waist seam above the waist (so it might actually appear to be smaller), and some darts or princess seams for shaping, but nothing too complicated because then it runs the risk of being trendy. I also liked Butterick 5396 for all the same reasons I chose B5459, but it came down to a neckline thing--round neck or v-neck? Although, B5396 does have those nice princess seams in front and back...see? Who knows? I might still change my mind! Once my muslin is cut out and basted together, that will be IT! No more going back and forth since that muslin has to go to Atlanta with me!
See? Pattern agonizing is a ton of work. I'm not generally a waffle-y type of person, but this has been a major piece of indecision for me! Silly!
Even more silly since I know I'll have plenty of help--I've gotten wonderful, helpful emails from Susan (how does she have time?) about our prep for the class. And what I learn in fitting this dress, no matter which one it is, I can carry over to future dresses.
One of those deadlines that's upcoming is preparing for the American Sewing Guild Conference! Very exciting since I'm sure I won't be going again any time soon. I chose mostly full day classes since I'd really like to expand my horizons and try things I've never done before...like jeans and bras. Blessedly, those classes have easy prep--show up with a few items for the most part.
The only class that has quite a bit of prep beforehand is The Little Black Dress with Susan Khalje. I'm really
So after much agonizing and pouring through the various pattern companies' websites plus the suggestions that Susan sent for patterns, I chose this Butterick 5459:

That would be View C, the middle picture, not the coat views! I wanted something classic, with a seam at the waist (so I might look like I have a waist), with the waist seam above the waist (so it might actually appear to be smaller), and some darts or princess seams for shaping, but nothing too complicated because then it runs the risk of being trendy. I also liked Butterick 5396 for all the same reasons I chose B5459, but it came down to a neckline thing--round neck or v-neck? Although, B5396 does have those nice princess seams in front and back...see? Who knows? I might still change my mind! Once my muslin is cut out and basted together, that will be IT! No more going back and forth since that muslin has to go to Atlanta with me!
See? Pattern agonizing is a ton of work. I'm not generally a waffle-y type of person, but this has been a major piece of indecision for me! Silly!
Even more silly since I know I'll have plenty of help--I've gotten wonderful, helpful emails from Susan (how does she have time?) about our prep for the class. And what I learn in fitting this dress, no matter which one it is, I can carry over to future dresses.
Subscribe to:
Posts (Atom)