Sunday, March 25, 2012

Ragtime Fabrics in Harrisonburg, VA

A Review of Ragtime Fabrics:


I think you have to be a certain personality to enjoy shopping here.  Don't get me wrong; there's a great assortment of fabric and trims, but this store is seriously cluttered.  I wish I'd taken a picture of it--lots of fabric in a space not quite big enough to comfortably hold it all! 

Now, the flip side to the large quantity of fabric is that there's plenty to see and choose!  They have everything:  home dec, quilting cottons, silks, denim, wools, and rayon batiks! 

Rayon batiks are hard to find around here, so despite trying not to add to my stash I really wanted at least one of these to make another Bias Top. Quick, easy, and great to wear for summer so it's hard to go wrong with it!

Plus they have lots of the usual polyester stuff you might find at a chain store. As I was leaving, I noticed some fabulous looking trims, but just didn't have the mental energy to look more at them--it's just hard to notice everything here. 

Another downside to Ragtime Fabrics--some of the fabrics don't have their content listed so sometimes it's a guess.  On the other hand, their prices are pretty good.  My batik was about 20% to 30% less than I can find other places.  I also considered an interesting reversible denim piece but couldn't think of what I'd make so you'd see both sides.  They had several wools that I thought about  for my Couture Dress, but in the interest of stash control I didn't buy them since I already have a silk in stash for it. 

So, is it worth the trip?  Most definitely!  Just allow plenty of time to browse with maybe a break so you can absorb everything.  It looks like this month they have an anniversary sale so it's a good time to visit!

Thursday, March 8, 2012

Mini Bow Tucks Bags

In my efforts to make my sewing room neater and more efficient, I felt compelled to deal with my piles.  It's amazing what does pile up in my sewing room:  mending, fabric acquisitions, UFO's, patterns, odds and ends....

Here's one pile:

It's sitting on a sunny window seat hence the bright spot.  One pair of slacks which needs a zipper repair and 2 mini-bow tucks bags, cut out and ready to assemble.


So, rather than sew up the top that I started cutting out in January, I opted to deal with my pile.  Most of the other piles are gone or shoved into a closet so at least I have the appearance of orderliness.  These Mini Bow Tucks bags were originally intended as Christmas gifts, but due to lack of recipient enthusiasm I lost sewing enthusiasm and decided I didn't feel like making anything for anybody any more.  haha  I've made a couple of these bags before (here and here) and they are relatively quick and very easy to put together (except for the quilting part--just my opinion, but I hate that part!).


I used a double button, layering a smaller red button on top of the large navy blue button since it matched better than anything else I had....

The above version is sewn per the pattern instructions for the handle length which is really short.  The next one, I made longer handles which does distort the proportions but fits better over the shoulder.


And, finally one tip about these bags.  Instead of using the tag board or cardboard stuff they suggest for inserting into the bottom to keep the structure, I use plastic needlepoint canvas and cut it to size.  It's washable by hand and easy to cut and insert.  A fellow ASG member told me about that and it was a great suggestion!

Now, while I don't feel like giving these bags away as gifts, I will probably donate them to our ASG fundraiser in November.  We're having a silent auction of handmade items.  Seems like a great opportunity to do some Christmas shopping!

Tuesday, March 6, 2012

The Craftsy Class

I signed up for my first www.craftsy.com class after hearing about them from a friend.  I hadn't heard much at all about Craftsy, but I have to say that I'm really lovin' it!  I am taking Susan Khalje's class, The Couture Dress.  At the national ASG conference in Atlanta in 2012, I took Susan's Little Black Dress class.  I thoroughly enjoyed that and learned quite a bit.  This is similar, but has lots more detail.  Plus, one huge advantage is being able to view the videos as often as you want and take notes online while you're watching it.  It's the greatest, neatest thing!  You can also ask questions and Susan responds quickly (a day or less).  It's interactive so that others can chime in with questions and answers of their own.  For an online class format, it is wonderful.  So much better in terms of format than any other online format that I've taken.

Optimally, I should be sewing along with the videos, but one of the super nice things about these classes is that I can work at my own pace and the videos and q&a are always available to me!  If I need to stop working on this and want to pick back up in five years or so, I can do that and it's all still available to me!  How great is that?  Anyway, there is one pattern that you get with the class fee which I will use for my dress.  Susan also makes four other suggestions for patterns.  I have a fellow ASG member who has opted to use one of the other four. 

Here's the pattern that you get with your fee, mailed to you from Vogue.  Mine came really fast!

Class pattern

An alternative class pattern suggestion
Altogether, there are 3 of us locally who are taking this class and we hope to work together to keep us motivated and help each other with fitting!  There's also the fun factor of getting together with sewing friends! 

After signing up for this class and watching a video segment or two, Kenneth King had a class appear, Jean-ius!, so I bought that one, too.  Besides, Craftsy sent me a half off offer for signing up for my first class.  How could I resist?  It's a great deal, plus I can start this one later...after I make my couture dress! 


I still have another project that I'm working on and haven't really delved into this one yet, so more later!

Sunday, March 4, 2012

Another Intermission

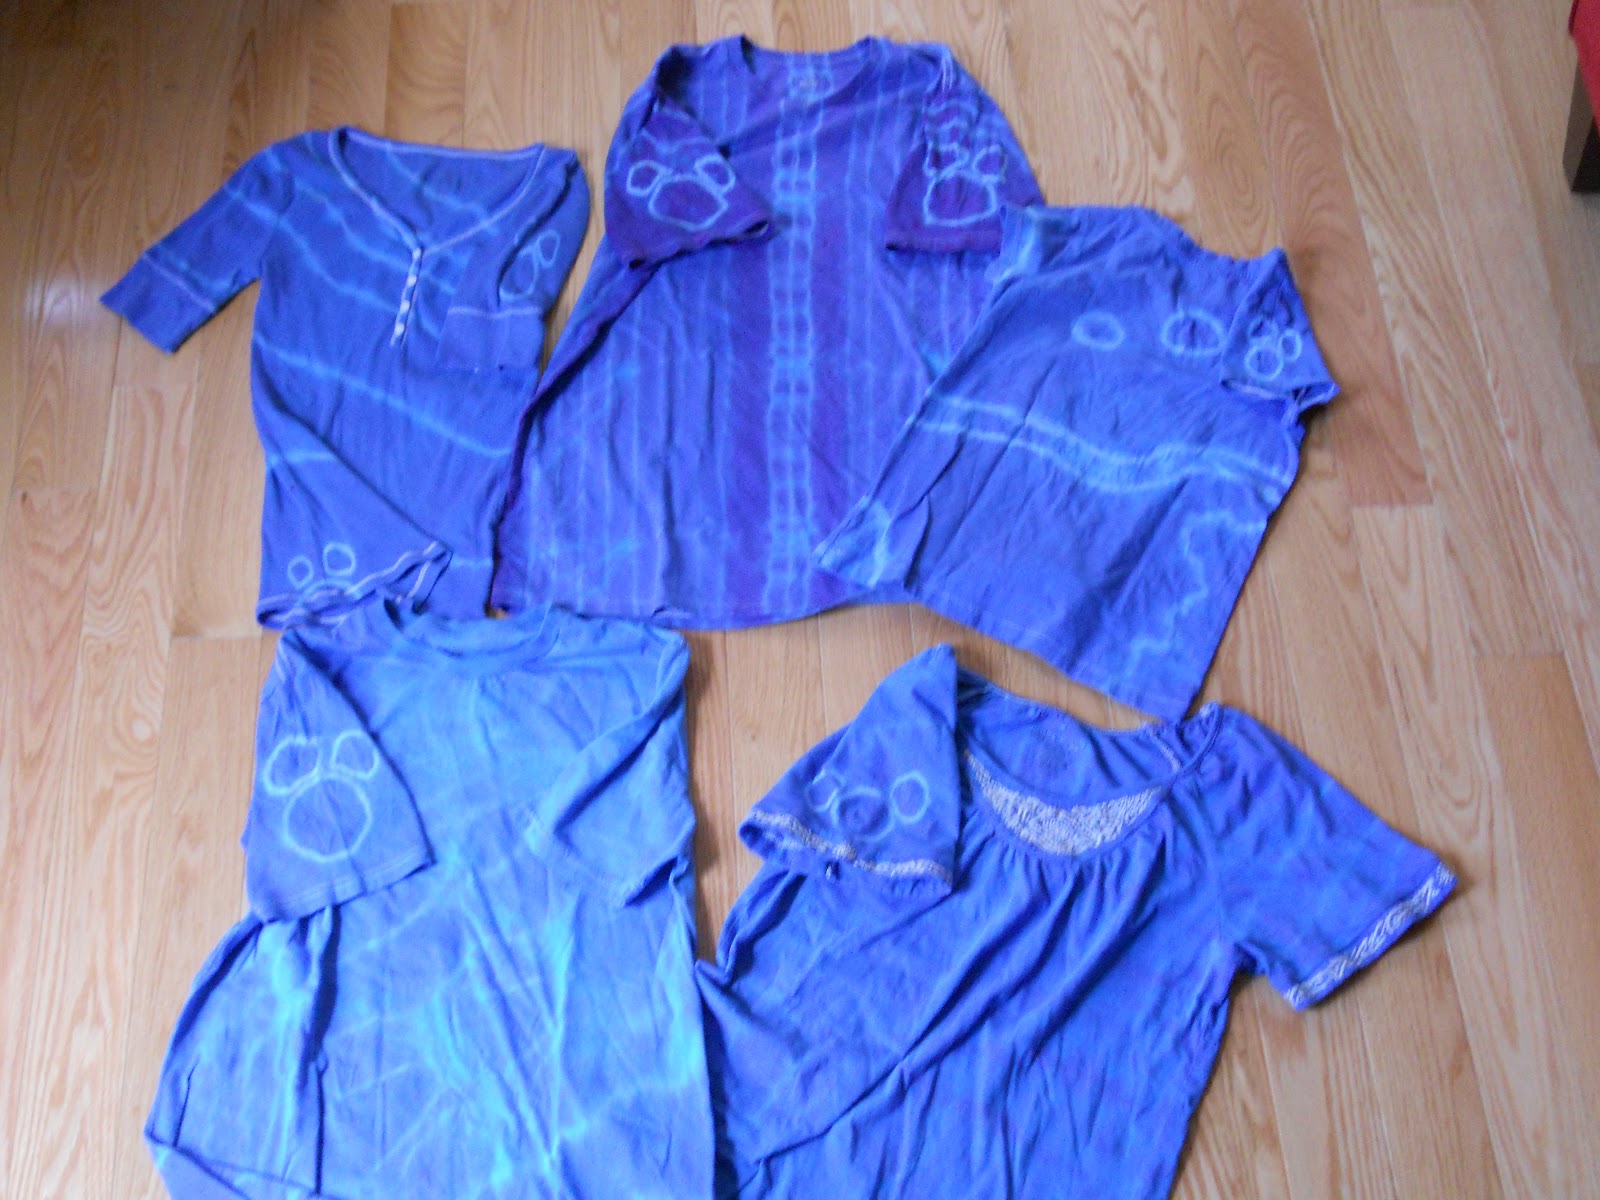
As we did last year, we made another batch of tie dyed t-shirts for our family's annual trip to Walt Disney World.  This year, we tied our own shirts except for the hidden Mickeys on these (last year, dh did it all).    My dh is good at them, so he put one or more on each shirt.  Oldest dd got one mailed to her while we were gone as a surprise. 

After last year's faded dye look, I emailed Dharma Trading and asked about handling tie dye in a front loading washing machine.  They answered that the only thing to do differently would be to do a brief soak in very hot water in the sink using Synthrapol, then washing in the machine per the directions on a very long cycle.  Well, I guess I really wanted to NOT have the faded look again so I must've used a lot more dye in the dye soak.  These are really dark and unless the tied places were super tight, the dye bled through.  Needless to say, dh wins the prize in tying tightly...and irritatingly.  He had his wrapped around 2 PVC pipes which I don't even want to think about because let's just say that I had dye all over the kitchen with that set up!


Here they are:

From top left:  oldest dd, dh, youngest dd
Bottom: ds, mine--it had some embroidery on it which didn't dye but looks kinda neat that way.
For those who don't know and are interested, you can read more about hidden Mickeys here.

Wednesday, February 29, 2012

Girls' Pj's

I know, it's all I seem to sew!  I made these before oldest dd went back to college so I didn't get any pictures of her pj bottoms.  (Oldest dd made the Dean's List in her first semester at college!  Always exciting, but especially so when you have homeschooled--it's really nice to know that you actually taught something and the student actually learned something!

There was enough for a cropped pair for youngest dd to have some to match so here are hers:

Shiny satin pj fabric with cotton backing.  Yes, it's the Little Mermaid!

Youngest dd's pj bottoms with purchased t-shirt.

Thursday, February 2, 2012

Jeans

I finally made my first pair of jeans!  I started them earlier in the fall, made great progress--only the waistband, belt loops, and hemming were left--then the holidays hit.  They finally got finished last month and I finally got pictures taken this month...!


I used J. Sterns Designs jeans pattern because I had taken her jeans muslin class at the ASG conference in Atlanta 2010.


Who knew that the Compensation Plate for sewing buttonholes on the Bernina machines actually worked?  If I remember correctly, even my dealer had her doubts and told me to return it if I didn't like it when I bought it.  I had gotten it orginally to help sew buttonholes on lightweight smocked dresses--those buttonholes at the top and bottom can be very difficult if you have lots of intersecting layers (collar, piping, gathering, etc) so I hoped it would help keep the buttonhole even.  It didn't.  At all.  So I learned to do buttonholes manually on my machine. 

Oddly, making a manual buttonhole on jeans wasn't working (and believe me, I first tried a regular buttonhole and I was NOT enjoying being friends with my seam ripper....!).  So, in a last ditch effort, I thought of this gadget.  Would you believe it worked beautifully????  It helped feed the bulky fabric evenly and gave a very nice buttonhole!


See?  It really is a nice buttonhole despite being redone (and ripped out) multiple times!


I think designing the back pocket stitching is the most fun thing to do when sewing jeans!  I decided to make a cypher (a weird way to do your monogram) using my initials.  At first, I planned to make the pocket flap, but as the project neared completion I opted to not include that.  Impatience factor!


Mrs. Green Jeans.  Okay, joking aside, I didn't want to use my nice, regular denim for my first pair so I bought this teal colored cheapy denim from Joann's.  Sadly, cheapy is the right word for it as I don't think it will hold up well.  It definitely seems to stretch out of shape quickly despite having no lycra.


Pockets!  It's also fun to choose the fabric for that!  Really, the topstitching doesn't show up at all on my real jeans, this is bright and shiny due to the flash.


Well, since it's my first pair, I'm not unhappy with them but I'm also not thrilled.  First, I made the waist way too tall--I didn't want those stupid low-rise jeans things which just look horrible on nearly everyone except young girls with really flat tummies!  Just sayin'.  Unfortunately, I misjudged how tall even though it seemed just right when I basted and tried them on.  Oh well, that's an easy fix for the next pair.

They are also a bit large throughout, which Jennifer had mentioned I might want to take in the seams by a bit and on the next pair I will.  The only other thing is the crotch sits low.  It starts fine but slips down moments after putting them on.  I think this is due to the waist being super loose (I need a belt) and just being a bit big in general throughout the hips.  You would think that basting and trying them on would help pinpoint these issues so they could be corrected before you get them all sewn, but either basting didn't help me or I was just too excited to finally be sewing on these to notice :)   haha!

This color doesn't go with *anything* in my wardrobe except plain white.  Boring.  So I bought a print at Joann's to make a top, which I have not gotten much of a chance to work on yet.  Besides, I still owe you pictures of the girls' pj's and my other project:  The Annual Tie Dye!

Saturday, January 21, 2012

Sewing Room Organization and Mini Tour

Blogging can be random, right?  Here and now I should be posting about my jeans that I completed two weeks ago and the pajama pants that I sewed for the girls a week or so ago.  But, no.  Here I am ready to talk sewing room organization.  Go figure. 

I guess the Picture Problem is one excuse.  I hate the whole picture thing--thinking about doing them (oh yeah!  I should have taken a picture of that--notice that past tense thing); uploading them; editing them; putting them on blogger and then writing about them at the proper place and time--all of that stuff makes me slow.  And apparently it makes me random because I have the pictures for the ongoing sewing room organization but not any pictures of finished jeans or pj's!

As I said, sewing room organization is an ongoing project and over the last six months I have made considerable progress.  I still have a long way to go as in I could actually put things away after I get them out and am done with them.  Still working on that one!  I do it when I cook, so why not when I sew? 

The next thing that brought this post forward, was a conversation with a fellow ASG member.  We were marveling, gawking, drooling and just plain envying another member's sewing space.  It's bright, cheerful, colorful, organized, quirky, clever, innovative and just plain ol' fun (and enviable!).   She's happy to show it off, even with people having to go through her front door and upstairs.  And why can't I have that, too?  Well, I guess that would mean not only a clean, neat home but also one that has some style and decent flooring and such (I think that means no fur--we have A LOT of fur).  Some of the main rooms are like that; certainly not all of them.  One day!  But in the meantime, the sewing room is getting some of the attention that it needs so I can enjoy the space (and be more productive???).

Anyway, here's the UGLY part.  This is part of why I'm not really happy with my sewing space.
Ugly paneling.  Very Ugly Paneling.  Extremely Mega Ugly Paneling.  Not only is it this lovely, but it is textured, too!!!!  That means my fabric catches on it!


The Extremely Mega Ugly Paneling in action with sewing supplies propped up.


Now, in order to combat that particular problem in a time long, long ago, we conceived a solution that would minimize construction and pain.  And it was this:


Corks!  Wine corks!  Lots of 'em.  They are cut in half to minimize how far they extend into the room.  And, NO, we did not drink all the wine to get the corks!
Yes! Practical, functional, not un-beautiful, fun, innovative, clever...and slow.  It is smooth and doesn't catch my fabric which is another benefit.  And I can use it like a bulletin board.  Eventually.  When it extends to cover more wall space that will be a nifty use for it. 

Well, in the meantime, I have been gradually working on other areas of the sewing room to make it more organized and more user-friendly.  First, my dh installed a hanging rod so that I can hang up ongoing and future projects on it.  I really like that it helps get the piles off the other surfaces in the room. 


Not the most beautiful in the world, but highly functional.  It sits over the youngest dd's sewing/work/play table, which dh made many years ago as a school table for the older kids when we began homeschooling.


Next, dh really outdid himself with this shelf project!  I love, love these!

Look at those wine corks along the edges!  One day it will look totally perfect with my walls!


The shelves were made to hold ironing supplies.  I'm still deciding what to put on them, but it's really nice to have a place that is not the floor or the ironing board for starch, water bottles, and pressing tools!


Those corks really, really look a ton better in real life!  Here, they look *almost* as ugly as that paneling, but it ain't so!


Won't that wall look terrific when it has all its corks on it? 


My sewing space is kind of awkward with lots of doors.  I really love the things that have been  added to help with space organization and need to continue to work on that so that my workroom can be a place that I like to show off!  Perhaps that's my 2012 resolution!


Friday, January 6, 2012

Christmas Gifts Received

I received several wonderful handmade items and craft books for Christmas this year and I thought I'd share them with you.  As you can tell from the bookmarks, I've already picked out some projects to make from the books!

First up:

Amy Butler's Style Stitches

The Beader's Bible by Dorothy Wood
My newest want-to-do hobby!

Simple Glass Beading by Dorothy Wood

 Now, to the handmade items!  First, is a make-up bag my stepmother made.  She even used some of that fusible vinyl on it so it would stay nice and be easy to clean!  Isn't it pretty with all the embroidery on it?


Next, are some bobby pins that oldest dear daughter beaded and gave to me.  They look really nice when I wear my hair up in a French twist, which I do frequently!


I thought that this scarf was very interesting.  One of my husband's co-workers made it and gave it to me.  It's quite simple, but very clever.  All it has are multiple types of yarn knotted together intermittently--no knitting, no crocheting!  The various yarns are simply lined up together and about every 12" they are knotted together.


Finally, this wasn't really a Christmas gift, but a very nice beginning to the holidays.  At the beginning of November, my local American Sewing Guild chapter held a drawing for a gift basket for all of the Shop Hop participants who went to all the shops.  Guess who won????!  Yes!  It is truly a terrific basket, filled with donations from the various shops who were in the hop.  It also included three very, very generous gift cards to sewing stores!!!!!!!  I was SO surprised and pleased. 


Saturday, December 31, 2011

Christmas Gifts 2011

Happy New Year to you all!  I got quite a bit of sewing done before Christmas to give away as gifts.  I had a few purses that I wanted to make, but I didn't get them done.  Too much going on, including illness #6, no it must be #5 because I think I have #6 right now.  I've never had so many cold, cough, and congestion type things in one single fall and winter.  It's become a joke.

I'm sorry to say that not only have I not blogged in forever and a day, I haven't even read a single blog in well over a month!  I've missed both, so it's good to (sorta) be back at it.  It might be slow going still, since I am really not joking about being sick so much.

This year, I made pillowcases and mailed them the week of Thanksgiving:


All were made as pairs, so 2 of each type.  A very underwhelming reception by the recipients, except for the pair that went to friends.  No more Christmas crunch sewing for me!  Bah humbug!

I had gotten a freebie tissue holder set to sew, so I made it up and gave it away.  Really easy and very cute!


I made a tote bag for my ds's Spanish teacher.  Wish I had taken the picture after I had sewn on the buttoms as they were perfect for the fabric!  This tote pattern is a freebie from a local shop and titled, "The 30-Minute Tote Bag".  I'll tell you now, it takes longer than 30 minutes!


Lastly, I made a table runner as a birthday gift.  It's called "The 10-Minute Table Runner" with good reason--that title is very accurate!


Before the holidays, I started on a pair of jeans.  They were set aside to work on the Christmas gifts, but they will be the first thing I finish this new year!  All that's left is the waistband, belt loops, and hemming.  More on those later.  

Saturday, November 5, 2011

Swimwear

At our last Sewing Guild meeting, a member brought a complete package for making a swimsuit for a little girl to our Ways and Means Table.  She showed it to me first since she knew I've made a couple of swimsuits.  And, look!  It has everything to make a swimsuit!  There's even a pattern, Kwik Sew 2884, in it.  It has all the elastic, lining fabric and the fashion fabric which won happy approval from youngest dd. 

While I won't work on this until next year, I was really pleased and excited to get this.  I was even happier that youngest dd loved the fabric!